
5 Easy Steps to Install a Retail Kiosk
- Edmon Torres

- Feb 18, 2019
- 3 min read
First thing first, you need to understand the exact location where you need to install the kiosk. The orientation of it must be finalize with your client and also with the mall management as some shopping malls has their own restriction in terms of positioning the kiosk. The clearance spaces between retail shop and other adjacent kiosks or stands plays a big factor in your kiosk. There should be no obstruction between the kiosk counters and other existing elements within the lease area.
All site measurements must be considered before laying out the kiosk foot print.
Once the above information is finalize, then it is time for you to execute the work.
Here are some of the few steps that will help you to successfully install a kiosk:

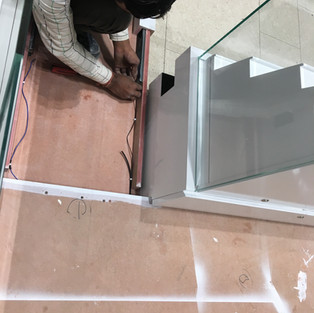
1. LAYING OUT THE PERIMETER BASE PLATFORM
After everything has been finalize in terms of location and orientation of the kiosk, a protection sheet must be kept in place before you start to position and assemble the raised platform on the area. We usually used a vinyl sheet as a protective layer, it is a mandatory to install this layer first in order to protect the existing mall flooring from any damages that can cause from installing the counters, parts of it, etc.

TIP:
To make this step much easier, all parts of the raised platforms must be labeled properly so you won’t mix any parts.
The electrical power provision must be accessible, to achieve this a cut – out must be provided on the wooden raised platform.
Once the raised platform is set on the location, final measurements and alignments within the perimeter area is a must.
It is important that the base is on the proper place before adding on the display counters.
2. ASSEMBLY OF THE DISPLAY COUNTERS
To begin putting the display counters in place, it is highly recommended to start at one corner and move on to the next. In this way, you can assure that each counter will fit within the base and with the adjacent counter.
Also, always label each counter prior to installation.
It will speed up the process of installation!

TIP:
Always keep the display counters near to its proper location. It will be easier to lift each counter – be practical and save the energy of your workers.
3. SET THE SIGNAGE PYLON
The signage pylon is one of the most important element of the kiosk. Aside from holding the brand name, it also serves as a landmark or icon of the structure. It should be very prominent and have a good visibility within the surroundings.
Some clients require to have a CCTV on their kiosk and the pylon itself serves to be the best place to keep those CCTV for security purposes.
Signage or branding should be well lit!


TIP:
Use a modern contemporary design on the signage pylon and add a touch of the client’s corporate color.
Signage / branding must be well lit and have a good visibility.
4. ENTRY MOVABLE COUNTER
The movable display counter should be set in place after completing the installation of all display counters.
It also serves as the main entry and exit point of the staff and in some cases, a normal flap door can be use as an alternative.


Begin with installing the side guide rails and follow by connecting the cable for the LED lights.
TIP:
Ensure that the base floor is properly leveled so that the movable counter will slide smoothly and effortless.
It is also practical to add 4 pcs of castor wheels on the base of the movable counter. In this way you don’t only rely with the guide rails to roll-out the counter.

TIP:
Ensure that the base floor is properly leveled so that the movable counter will slide smoothly and effortless.
It is also practical to add 4 pcs of castor wheels on the base of the movable counter. In this way you don’t only rely with the guide rails to roll-out the counter.
The movable counter should look like this.
Always keep a minimum gap (about 10mm) between the side surface of the movable counter and the adjacent display counter.
And when it is close, it should be align with the other display counters
5. FINAL TOUCH - UPS
A successful installation means everything must be in a proper place and even all equipments are working.
All LED lights are well lit and distributed evenly on the entire kiosk so that there will be no any dark spots when the merchandises are in place.

TIP:
A good lighting is a major factor to consider to have a good kiosk.
Comments